Gradio 教程
代码地址:
参考文档
https://www.gradio.app/guides/the-interface-class
1. 安装 Gradio
首先,确保你有 Python 环境,然后在终端运行以下命令安装 Gradio:
pip install gradio
2. 基本示例
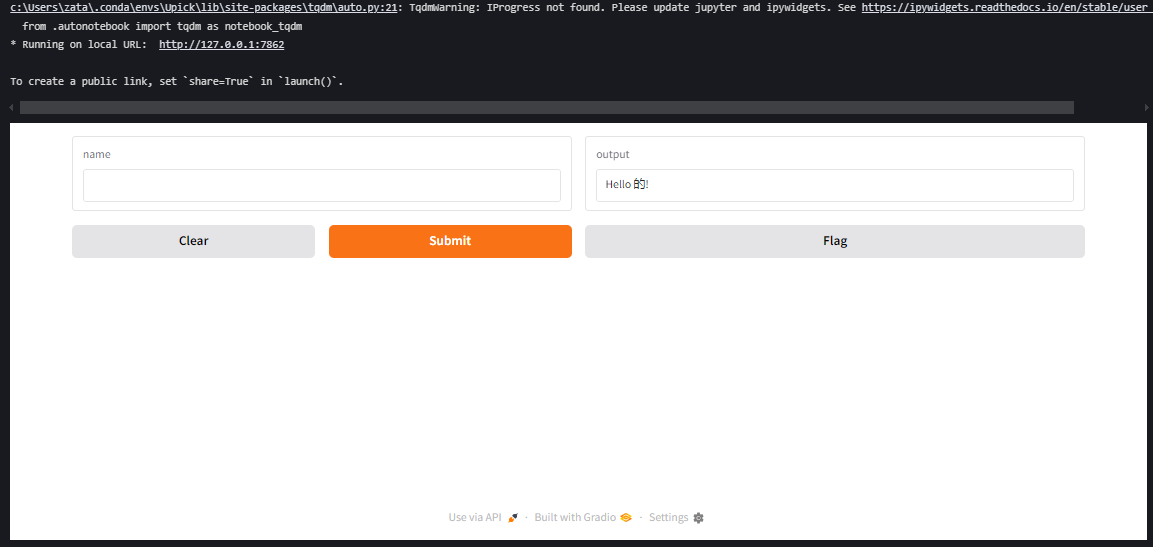
让我们从一个简单的例子开始:创建一个界面,用户输入名字,程序返回问候语。
import gradio as gr
#输入文本处理程序
def greet(name):
    return "Hello " + name + "!"
#接口创建函数
#fn设置处理函数,inputs设置输入接口组件,outputs设置输出接口组件
#fn,inputs,outputs都是必填函数
demo = gr.Interface(fn=greet, inputs="text", outputs="text")
demo.launch()
运行代码后,Gradio 会生成一个本地 Web 界面(通常在 http://127.0.0.1:7860),你可以在浏览器中输入名字并看到结果。
3. 界面参数说明
fn: 要展示的核心函数(例如greet)。inputs: 输入组件类型(如"text","image","audio"等)。outputs: 输出组件类型(如"text","image","label"等)。launch(): 启动界面,可以通过参数设置是否公开。
常用输入和输出类型
"text": 文本框"image": 图片上传或显示"audio": 音频输入或输出"video": 视频输入或输出"dataframe": 数据表格
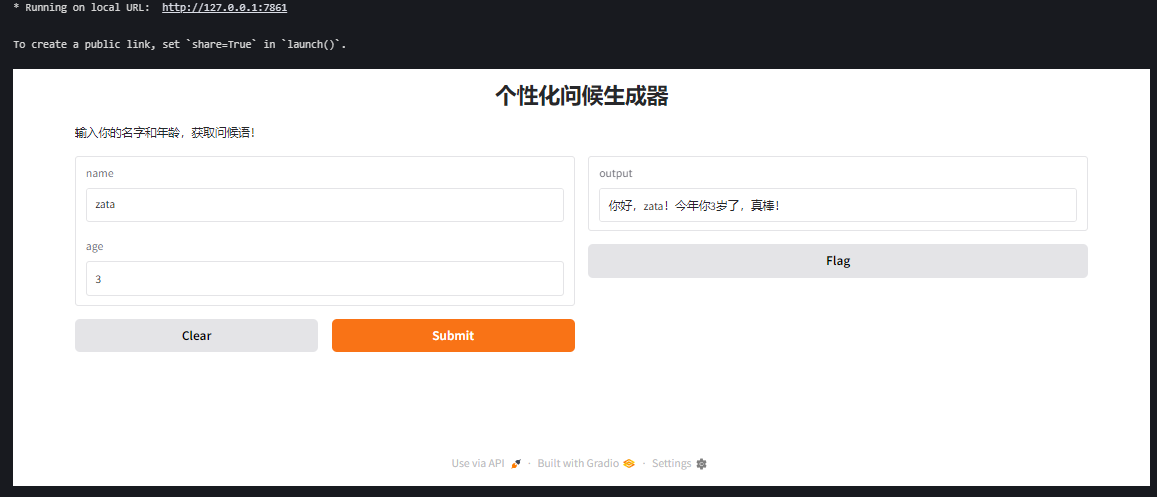
4. 进阶示例:处理多种输入
假设我们想创建一个函数,接收名字和年龄,返回个性化的消息:
import gradio as gr

def greet(name, age):
    return f"你好,{name}!今年你{age}岁了,真棒!"

interface = gr.Interface(
    fn=greet,
    inputs=["text", "number"],  # 多个输入
    outputs="text",
    title="个性化问候生成器",  # 添加标题
    description="输入你的名字和年龄,获取问候语!"  # 添加描述
)

interface.launch()
运行后,你会看到一个有两个输入框的界面:一个文本框输入名字,一个数字框输入年龄。
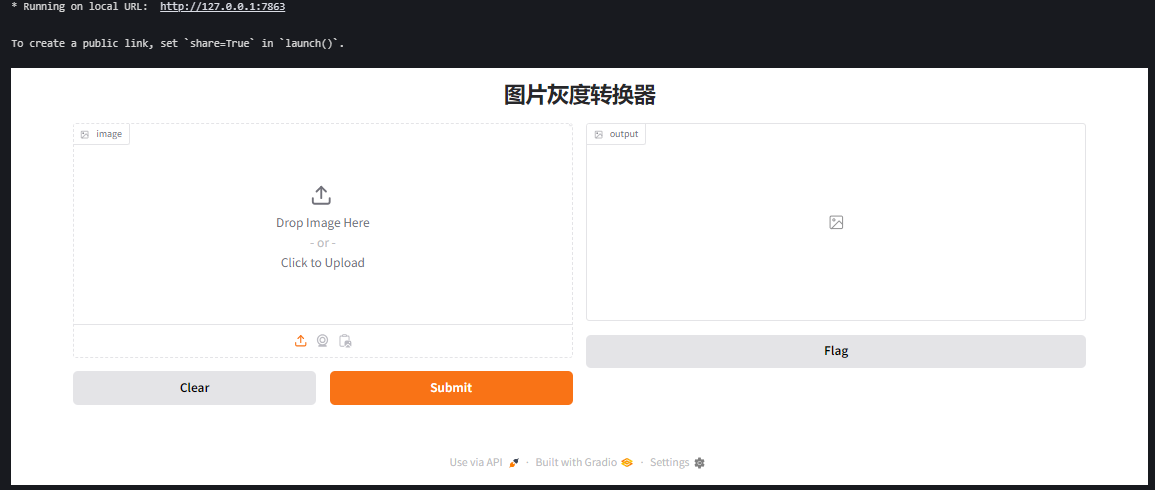
5. 处理图片输入和输出
假设我们要创建一个简单的图像处理函数,将上传的图片转为灰度:
import gradio as gr
from PIL import Image

def grayscale_image(image):
    return image.convert("L")  # 转换为灰度图

interface = gr.Interface(
    fn=grayscale_image,
    inputs="image",  # 上传图片
    outputs="image",  # 输出图片
    title="图片灰度转换器"
)

interface.launch()
用户可以上传图片,界面会返回灰度版本。
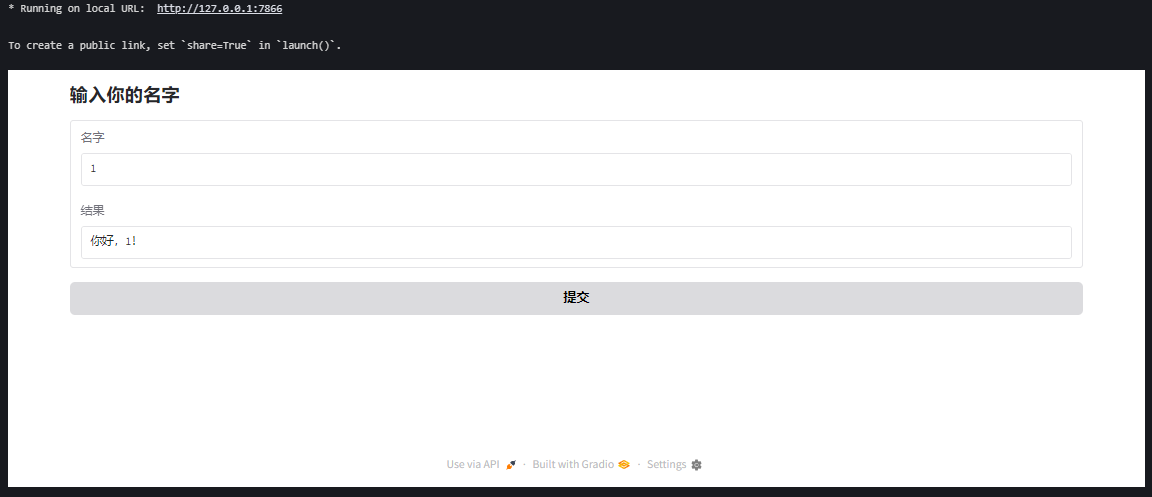
6. 自定义界面布局
如果需要更复杂的布局,可以使用 gr.Blocks:
import gradio as gr

def greet(name):
    return f"你好,{name}!"

with gr.Blocks(title="自定义问候界面") as demo:
    gr.Markdown("## 输入你的名字")
    name_input = gr.Textbox(label="名字")
    output = gr.Textbox(label="结果")
    button = gr.Button("提交")
    button.click(fn=greet, inputs=name_input, outputs=output)

demo.launch()
Blocks 允许你自由组合组件,比如按钮、文本框、图片等。
7. 分享到公网
默认情况下,Gradio 界面只运行在本地。如果你想分享给别人,可以设置 share=True:
interface.launch(share=True)
这会生成一个临时的公共链接(有效期通常为 72 小时)。
8. 常见问题
- 如何调试? 添加
debug=True参数到launch(),会在终端显示详细日志:interface.launch(debug=True) - 如何保存用户输入? 在函数中处理输入并保存到文件或数据库。
- 如何运行在特定端口? 使用
server_port参数:interface.launch(server_port=8080)
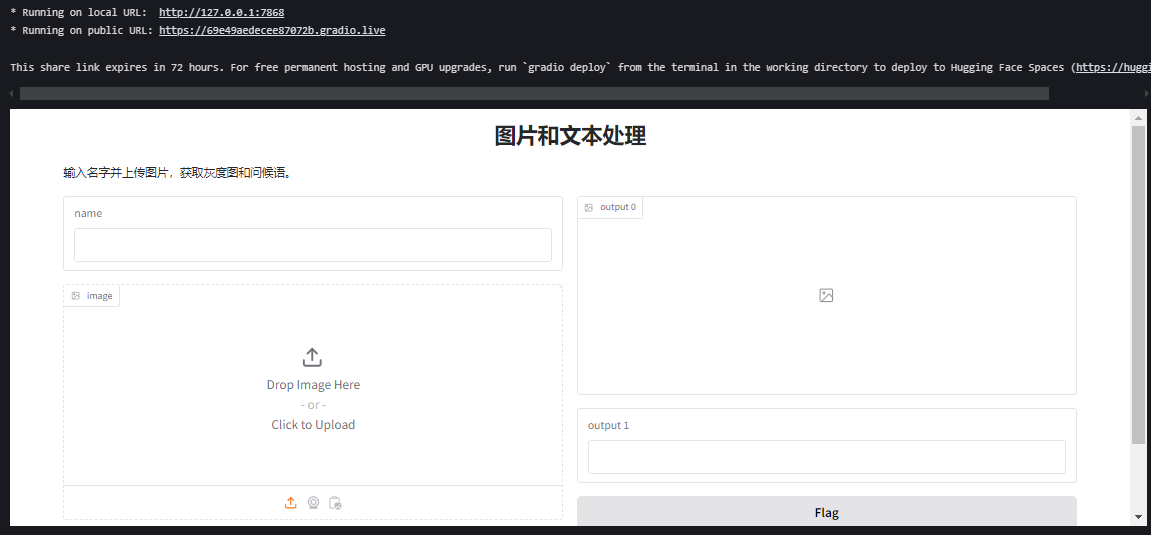
9. 完整示例:带图片和文本的复杂界面
import gradio as gr
from PIL import Image

def process_input(name, image):
    grayscale_img = image.convert("L")
    message = f"你好,{name}!这是你的灰度图片。"
    return grayscale_img, message

interface = gr.Interface(
    fn=process_input,
    inputs=["text", "image"],
    outputs=["image", "text"],
    title="图片和文本处理",
    description="输入名字并上传图片,获取灰度图和问候语。"
)

interface.launch(share=True)
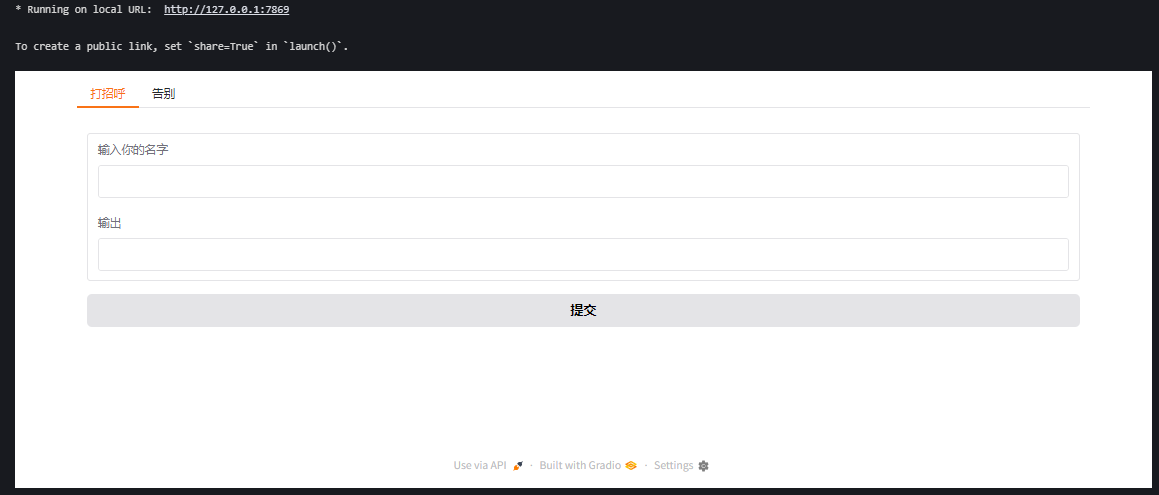
10. 带有tab的界面
import gradio as gr

# 定义两个简单的函数,分别用于不同的选项卡
def greet(name):
    return f"你好,{name}!"

def farewell(name):
    return f"再见,{name}!"

# 使用 Blocks 创建界面
with gr.Blocks() as demo:
    # 创建 Tabs 容器
    with gr.Tabs():
        # 第一个选项卡:打招呼
        with gr.TabItem("打招呼"):
            name_input_1 = gr.Textbox(label="输入你的名字")
            greet_output = gr.Textbox(label="输出")
            greet_button = gr.Button("提交")
            greet_button.click(fn=greet, inputs=name_input_1, outputs=greet_output)

        # 第二个选项卡:告别
        with gr.TabItem("告别"):
            name_input_2 = gr.Textbox(label="输入你的名字")
            farewell_output = gr.Textbox(label="输出")
            farewell_button = gr.Button("提交")
            farewell_button.click(fn=farewell, inputs=name_input_2, outputs=farewell_output)

# 启动应用
demo.launch()
gr.Blocks():创建一个灵活的界面容器。
gr.Tabs():定义一个选项卡组。
gr.TabItem(“标签名”):定义单个选项卡,标签名会显示在界面上。
每个选项卡内可以放置输入组件(如 Textbox)、输出组件和事件(如按钮点击)。
运行这段代码后,你会看到一个带有“打招呼”和“告别”两个选项卡的界面。点击每个选项卡,可以切换到对应的功能。
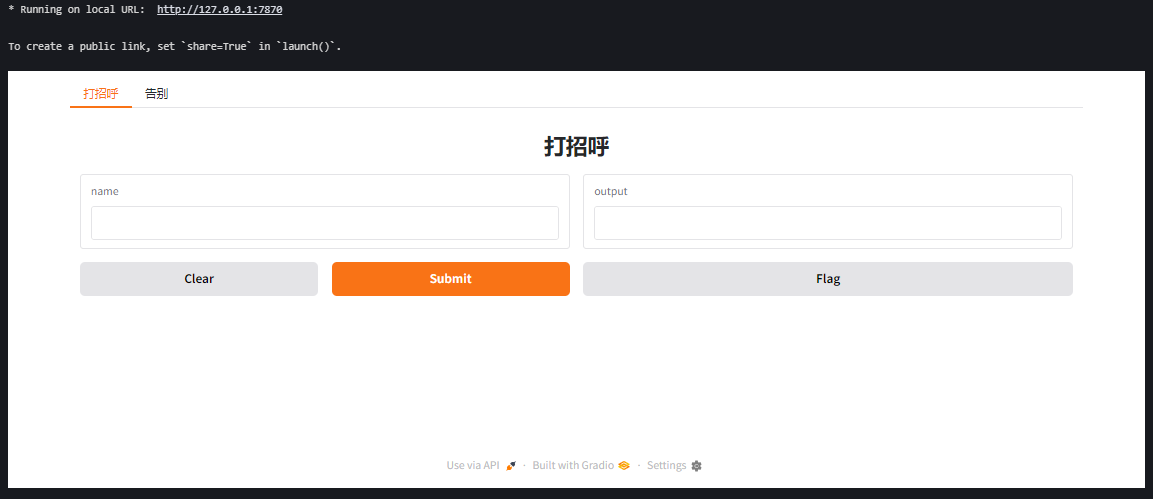
11. 使用 gr.TabbedInterface 组合多个界面
import gradio as gr

# 定义两个函数
def greet(name):
    return f"你好,{name}!"

def farewell(name):
    return f"再见,{name}!"

# 创建两个独立的 Interface
interface1 = gr.Interface(fn=greet, inputs="text", outputs="text", title="打招呼")
interface2 = gr.Interface(fn=farewell, inputs="text", outputs="text", title="告别")

# 使用 TabbedInterface 组合
demo = gr.TabbedInterface(
    [interface1, interface2],  # 接口列表
    ["打招呼", "告别"]        # 选项卡名称列表
)

# 启动应用
demo.launch()
代码说明:
gr.TabbedInterface 接受两个主要参数:
第一个参数是一个 Interface 对象列表。
第二个参数是选项卡名称的列表,与 Interface 顺序对应。
这种方法适合快速组合已有的界面,但灵活性不如 Blocks。
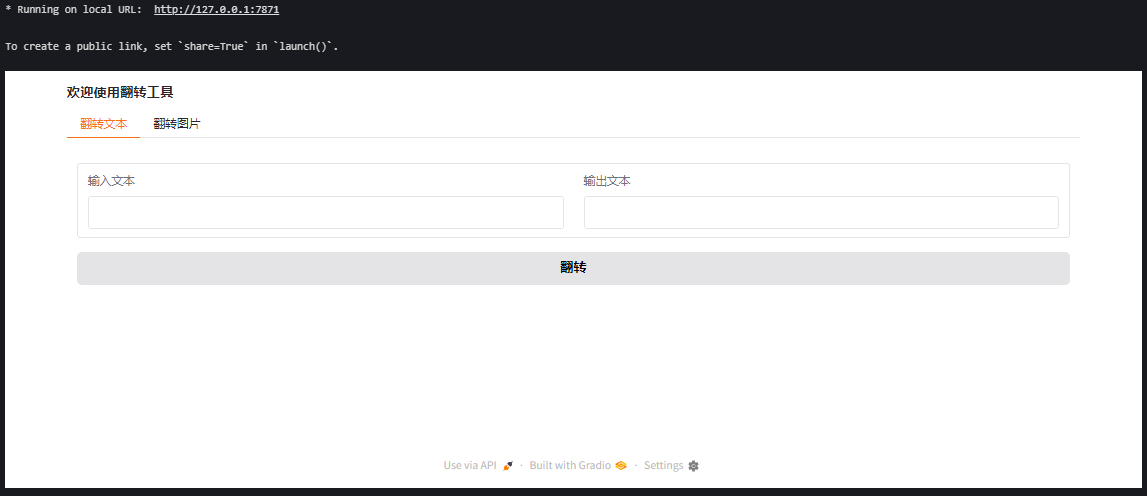
12. 高级布局:结合 Row 和 Column
import gradio as gr
import numpy as np

# 定义翻转文本和图片的函数
def flip_text(text):
    return text[::-1]

def flip_image(image):
    return np.fliplr(image)

# 使用 Blocks 创建界面
with gr.Blocks(title="翻转工具") as demo:
    gr.Markdown("### 欢迎使用翻转工具")
    with gr.Tabs():
        # 文本翻转选项卡
        with gr.TabItem("翻转文本"):
            with gr.Row():
                text_input = gr.Textbox(label="输入文本")
                text_output = gr.Textbox(label="输出文本")
            text_button = gr.Button("翻转")
            text_button.click(fn=flip_text, inputs=text_input, outputs=text_output)

        # 图片翻转选项卡
        with gr.TabItem("翻转图片"):
            with gr.Row():
                image_input = gr.Image(label="上传图片", type="numpy")
                image_output = gr.Image(label="输出图片")
            image_button = gr.Button("翻转")
            image_button.click(fn=flip_image, inputs=image_input, outputs=image_output)

# 启动应用
demo.launch()
代码说明:
gr.Row():将组件水平排列。
gr.Column():将组件垂直排列(默认布局)。
这个例子展示了一个文本翻转和图片翻转的工具,每个功能在单独的选项卡中。
总结
Gradio 的核心优势在于简单易用,适合快速展示和测试功能。你可以根据需求扩展功能,比如集成机器学习模型、处理音频视频、或设计复杂布局。如果有具体问题或想深入某个功能,可以告诉我,我再详细讲解!